Block access to removable storage while allowing exceptions? Device Control to the rescue!

Modern workplaces rely on USB drives, printers, Bluetooth devices, and other peripherals, but these devices can also introduce security risks. Microsoft Defender Device Control helps organizations manage which devices users can connect and how those devices can be used.
With Device Control, administrators can allow, block, or limit access to removable media, printers, and other peripherals based on factors such as device type, Serial numbers, VID/PID, HardwareId, or specific actions like read, write, and execute. This helps reduce the risk of data loss, malware infections, and unauthorized data transfers.
Integrated with Microsoft Defender for Endpoint and Microsoft Intune, Device Control provides granular policy management, visibility through reporting and Advanced Hunting, and support for scenarios such as USB control, printer restrictions, and BitLocker-encrypted removable media enforcement.
In this blog, we’ll take a practical approach and show exactly how to block all removable storage devices while allowing a specific approved USB device. This common security scenario enables organizations to prevent unauthorized data transfers while ensuring business-critical devices remain available to users.
In short, Defender Device Control gives security teams the ability to balance user productivity with strong endpoint protection, helping ensure that data stays secure wherever users work.
Create reusable settings
Before creating the Device Control policy, we first need to define two Reusable Settings. These settings act as reusable collections of device identifiers that can be referenced by multiple Device Control policies.
1. Allowed Devices – Reusable Setting
This reusable setting contains the USB device(s) that should remain accessible, even when all other removable storage devices are blocked.
- Open the Microsoft Intune Admin Center.
- Navigate to Endpoint security → Attack surface reduction.
- Select Reusable settings.
- Click Add to create a reusable setting.
- Choose Removable device.
- Enter the following:
- Name:
Allowed Devices - Description:
Approved removable storage devices
- Name:
- Add one or more device identifiers collected from the approved USB device:
- Name (required)
- Vendor + Product ID (PID_VID: 1234_63AV)
- Serial Number
- Instance Path ID
- Vendor ID (VID)
- Product ID (PID)
- Primary ID
- Device ID
- Hardware ID
- FriendlyName ID
- Bus ID
- Click Next and Create.
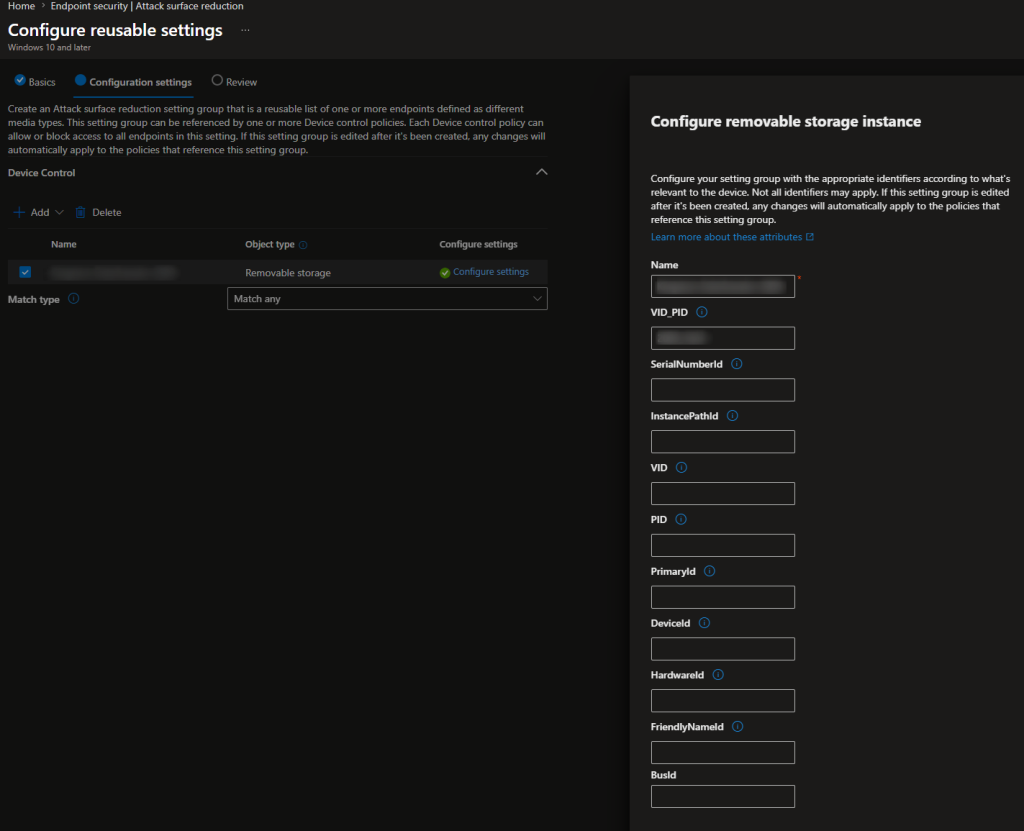
Note: This reusable setting will be used later in the allow policy to create an exception for approved USB storage devices.
2. Blocked Devices – Reusable Setting
This reusable setting represents all removable storage devices that should be blocked by default.
- Open the Microsoft Intune Admin Center.
- Navigate to Endpoint security → Attack surface reduction.
- Select Reusable settings.
- Click Add to create a reusable setting.
- Choose Removable device.
- Enter the following:
- Name:
`Blocked` Devices - Description:
`All removable storage devices`
- Name:
- Configure the setting to target:
- Primary ID:
RemovableMediaDevices
- Primary ID:
- Click Next and Create.
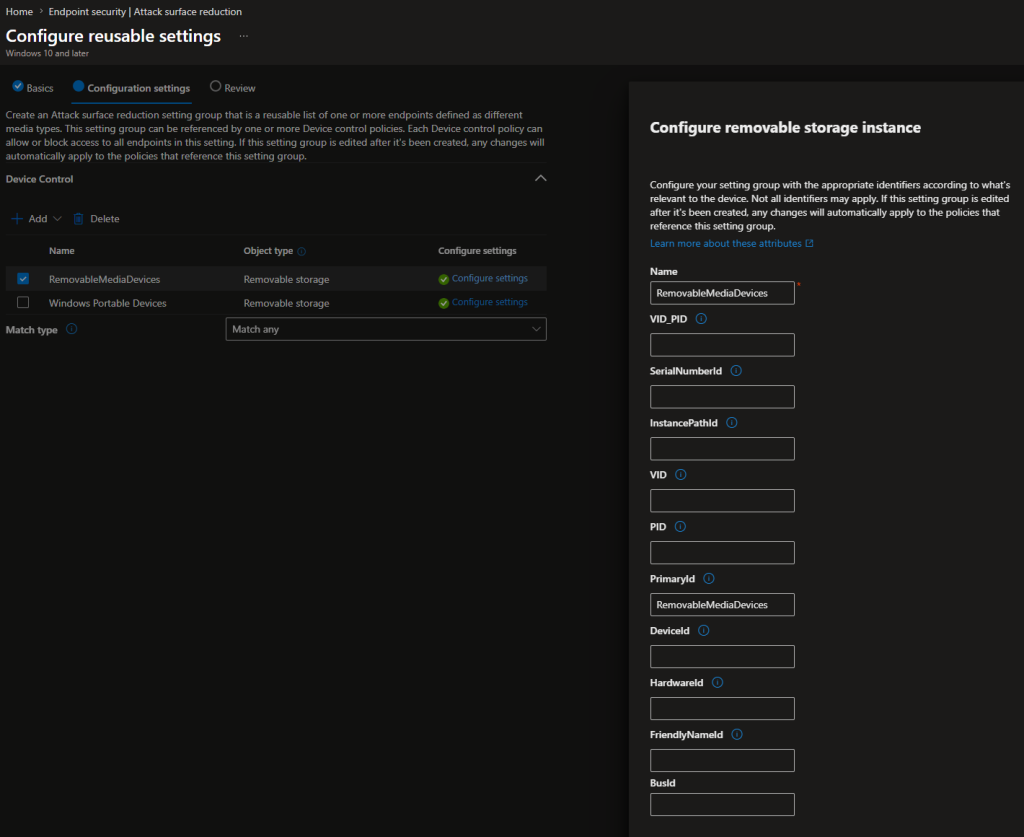
Note: This reusable setting forms the foundation of the default-deny approach, ensuring all USB storage devices are blocked unless explicitly allowed through the Allowed Devices reusable setting.
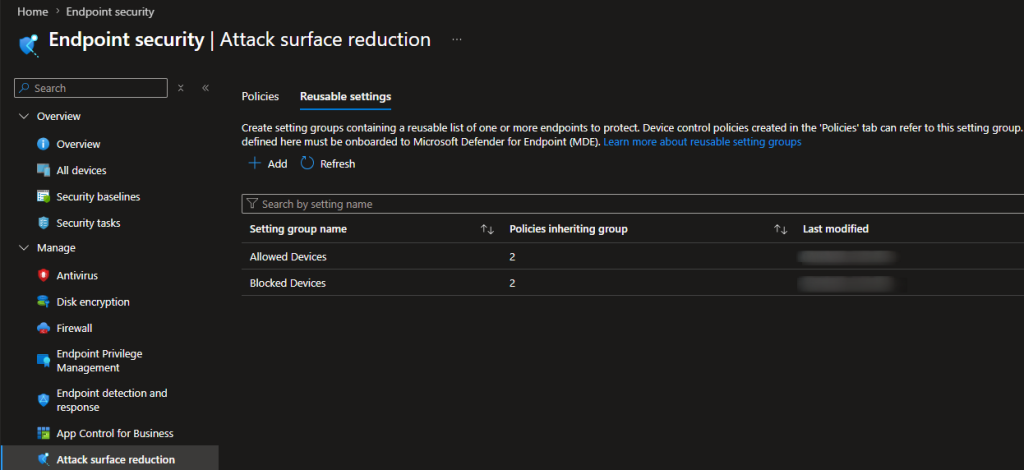
Result
After completing these steps, you will have:
- Allowed Devices → Contains the approved USB device(s).
- Blocked Devices → Represents all removable storage devices.
These reusable settings can now be referenced in Device Control policies to implement a block-all, allow-specific USB storage strategy.
Create Attack Surface Reduction – Configuration Policy
With the reusable settings in place, the next step is to create a Device Control policy that blocks all removable storage devices while allowing the approved device(s) defined in the Allowed Devices reusable setting. Device Control policies can be deployed through Microsoft Intune and provide granular control over removable media access.
1: Create a New Device Control Policy
- Open the Microsoft Intune Admin Center.
- Navigate to Endpoint security → Attack surface reduction.
- Select Create Policy.
- Configure the following:
- Platform: Windows 10
- Profile: Device Control
- Click Create.
2: Configure Device Control Settings
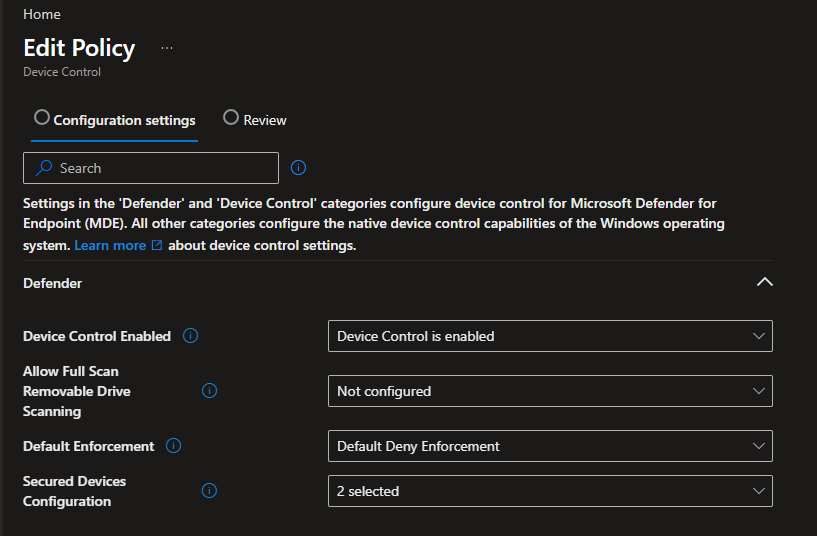
These settings enable Microsoft Defender Device Control and enforce a default-deny approach, ensuring removable media is blocked unless explicitly allowed by policy.
Under Defender:
3: Configure Block/Allow policies
The final step is to create the access control rules that determine which devices are blocked and which devices are allowed. In this example, we use a default deny approach by blocking all removable storage devices and then creating an exception for the approved USB device.
The Block rule targets the Blocked Devices reusable setting and denies access to all removable storage devices. The Allow rule targets the Allowed Devices reusable setting and grants access to the approved USB device. By combining these two rules, organizations can effectively prevent unauthorized USB storage usage while still supporting approved business devices.
As shown below, the policy contains two entries:
- Block: Applies to the Blocked Devices reusable setting and denies access to all removable media.
- Allow: Applies to the Allowed Devices reusable setting and grants access to approved devices only.
Note: Determine whether you prefer to include these settings within the general Defender / Device Control Policies or to create a distinct policy specifically for the block/allow actions.
Under Device Control:
- Click Add twice to create the block/allow policy settings.
- Assign names to both policies: Block and Allow
- Click Set reusable settings (Included devices) for the Block policy. Add the Blocked Devices group
- Click Save
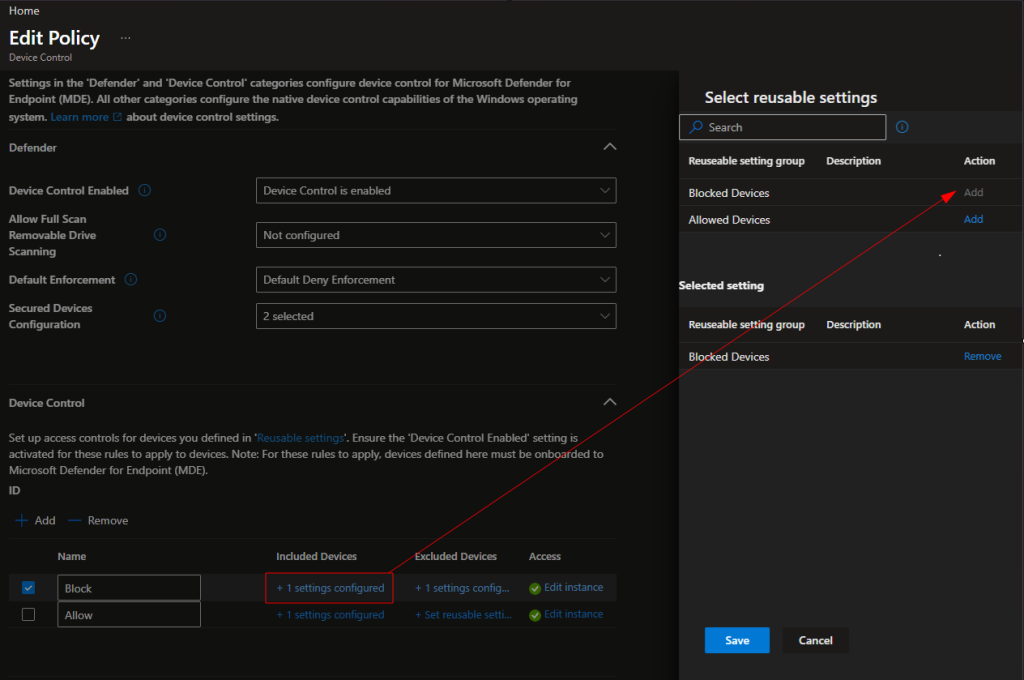
- Click Set reusable settings (Excluded devices) for the Block policy. Add the Alllowed Devices group
- Click Save
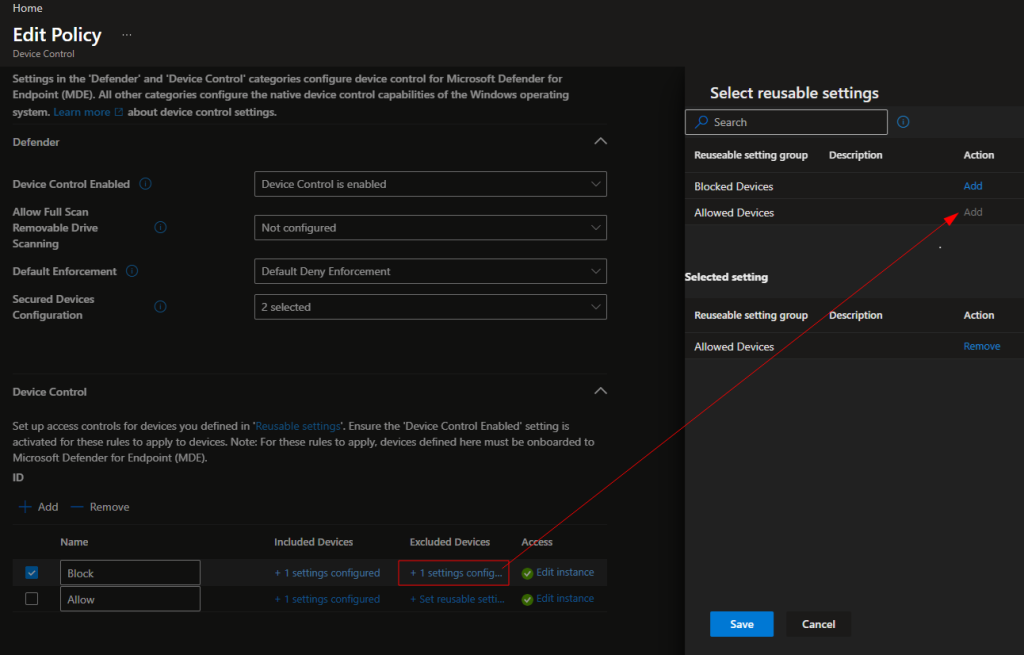
- Click Set reusable settings (Included devices) for the Allow policy. Add the Allowed Devices group
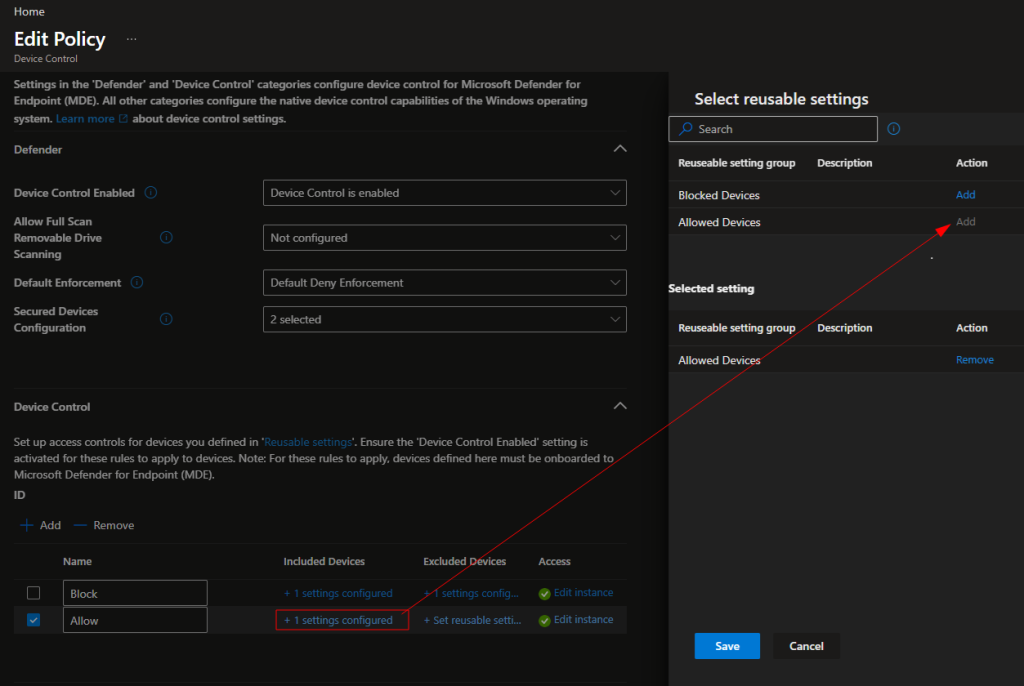
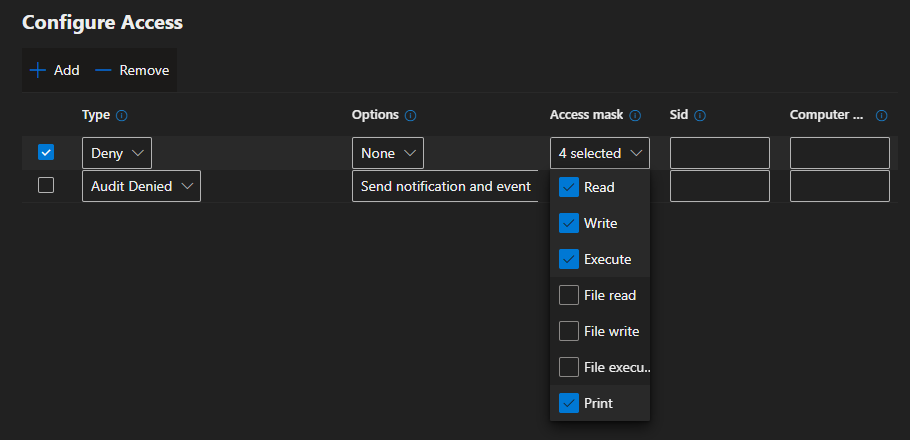
- Click Configure instance (Block rule) to configure the specific access permissions.
- Click Add twice
- Type: Deny
- Options: None
- Access mask: Read, Write, Execute, Print
- Type: Audit Denied
- Options: Send notification and event
- Access mask: Read, Write, Execute, Print
- Click Save
- Click Configure instance (Allow rule) to configure the specific access permissions.
- Click Add twice
- Type: Allow
- Options: None
- Access mask: Select all that apply
- Type: Audit Allowed
- Options: Send event
- Access mask: Read, Write, Execute, Print
- Click Save
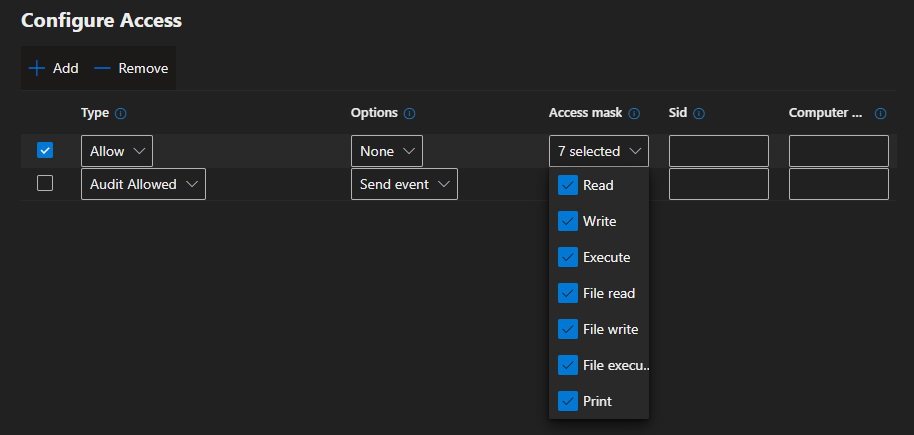
Note: Selecting Read, Write, and Execute also includes the access permissions for File read, File write, and File execute.
Assign the Policy
- Select Next until you reach Assignments
- Choose the target user or device group. Device group would be recommended.
- Click Next.
- Review the configuration.
- Click Create.
Verify Policy Deployment
After deploying the policy, it’s a good idea to verify that Microsoft Defender Device Control is enabled and that the configuration has been successfully applied to the device.
Get-MpComputerStatus | Select-Object DeviceControl*
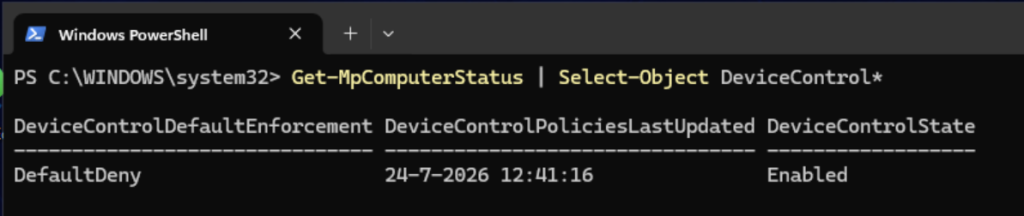
This command displays all Device Control related settings reported by Microsoft Defender. Review the output to confirm that Device Control is enabled and that the latest policy settings have been received by the endpoint.
A correctly configured device should show Device Control related properties and indicate that the feature is active. If no Device Control properties are returned, allow some time for policy synchronization and verify that the device is onboarded to Microsoft Defender for Endpoint and has received the Intune policy assignment.
Using this PowerShell check provides a quick and reliable way to validate that Device Control is operational before testing access with approved and blocked USB devices.
Device Control in action!
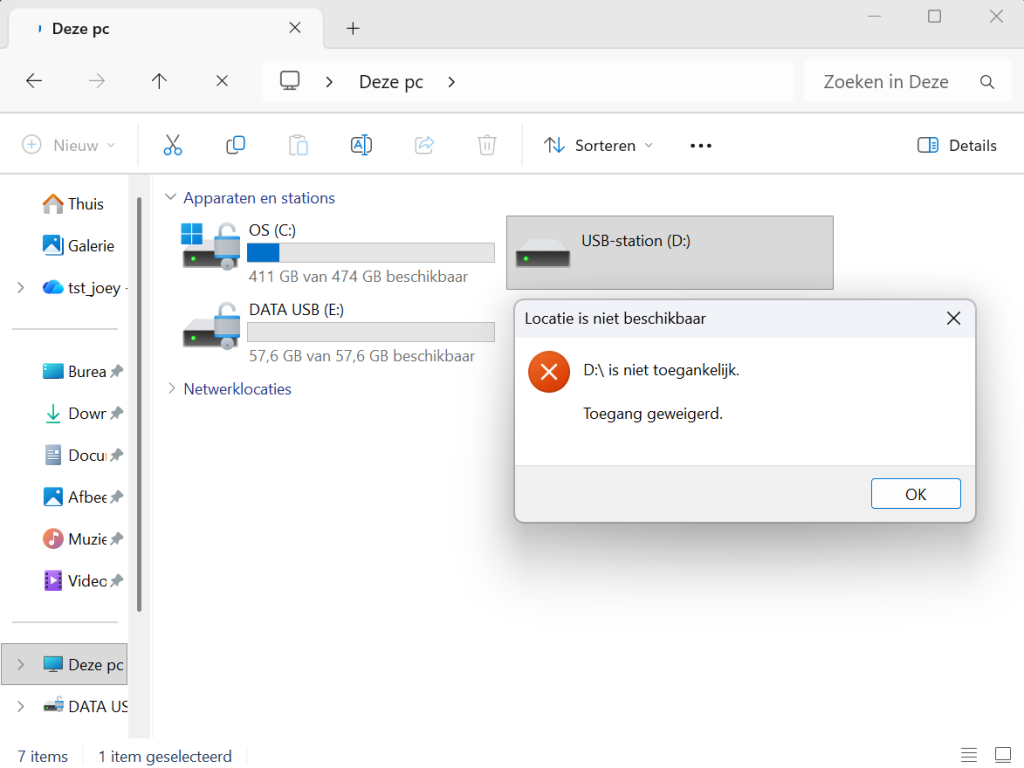
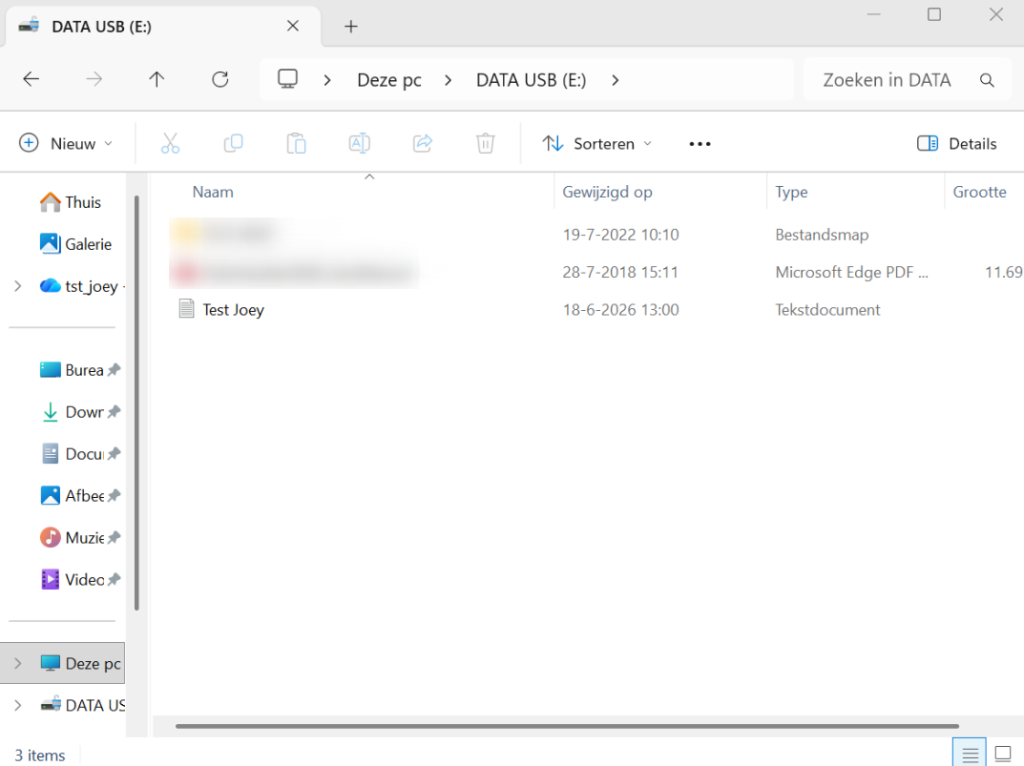
After the policy has been deployed, it’s important to validate that the intended behavior is working correctly. In the example below, an unapproved USB storage device is blocked by Microsoft Defender Device Control and cannot be accessed through File Explorer. At the same time, the approved USB device, which is included in the Allowed Devices reusable setting, remains fully accessible.
This demonstrates the effectiveness of a default deny, allow by exception approach. All removable storage devices are blocked by default, while approved business devices continue to function normally, providing a strong balance between security and user productivity.
OOBE Autopilot Experience
In certain cases, when deploying new devices through Autopilot, Defender Device Control may not activate right away after deployment. It can sometimes take up to 24 hours for Defender Device Control to become operational, which could create a security gap during this period. Therefore, I suggest deploying this PowerShell script by Peter Klapwijk as a Win32 App during the deployment process.
Monitor Device Control Events (Advanced Hunting)
Microsoft Defender for Endpoint logs Device Control activity in Advanced Hunting, allowing administrators to verify that policies are working as expected and identify when users attempt to access blocked removable storage devices. When a Device Control policy is triggered, the event is recorded with the action type RemovableStoragePolicyTriggered.
Use the following KQL queries to view recent Device Control events:
DeviceEvents | where Timestamp > ago(1d) | where ActionType in (“RemovableStoragePolicyTriggered”) | extend parsed = parse_json(AdditionalFields) | extend MediaClass = tostring(parsed.ClassName) | extend MediaSerialNumber = tostring(parsed.SerialNumber) | extend RemovableStorageAccess = tostring(parsed.RemovableStorageAccess) | extend RemovableStoragePolicyVerdict = tostring(parsed.RemovableStoragePolicyVerdict) | extend RemovableStoragePolicy = tostring(parsed.RemovableStoragePolicy) | project Timestamp, DeviceName, AccountName, InitiatingProcessAccountName, ActionType, MediaClass, MediaSerialNumber, RemovableStorageAccess, RemovableStoragePolicyVerdict, RemovableStoragePolicy, AdditionalFields | order by Timestamp desc
DeviceEvents | extend parsed = parse_json(AdditionalFields) | extend MediaClass = tostring(parsed.ClassName), DeviceId = tostring(parsed.DeviceId), DeviceDescription = tostring(parsed.DeviceDescription), SerialNumber = tostring(parsed.SerialNumber), PolicyName = tostring(parsed.RemovableStoragePolicy), AccessType = tostring(parsed.RemovableStorageAccess), Verdict = tostring(parsed.RemovableStoragePolicyVerdict) | where ActionType == “RemovableStoragePolicyTriggered” | project Timestamp, DeviceName, InitiatingProcessAccountName, DeviceDescription, SerialNumber, PolicyName, AccessType, Verdict | order by Timestamp desc
Written by Joey Verlinden
Back to all articles